Well, I did it. I finally joined the “cult of tubeless” ditching those pesky inner tubes and switching my tubeless-ready carbon wheels to run fully tubeless.
It wasn’t quite as straightforward as inner tubes. It did involve some head scratching, a bit of Googling and some sage advice from tubeless friends to get set up. I’ve learnt a lot! Future tubeless tyre installs should be far smoother. To save you the same troubles I had here’s five quick tips for anyone considering going tubeless:
1) Set up your wheels with care. If your wheels have exposed internal spoke holes, you’ll need to wrap some tubeless rim tape over the top. Note that this is different from regular rim tape! Be sure to use a tubeless rim tape for the job. Many brands recommend two full wraps. If your rims are internally sealed like mine were, you will not require rim tape. Next install the tubeless valve. Be sure to get a snug fit against the internal surface (the valve nut should be finger tight).

2) Use an air compressor. Mounting and setting up tubeless tyres is arguably more difficult and time consuming that simply whacking in a tube. The tyres need to be “seated” correctly onto the tubeless-compatible rim. Some rim and tyre combinations will easily snap onto rims with a few pumps from your track pump, while others (like mine) need a hit from compressed air.
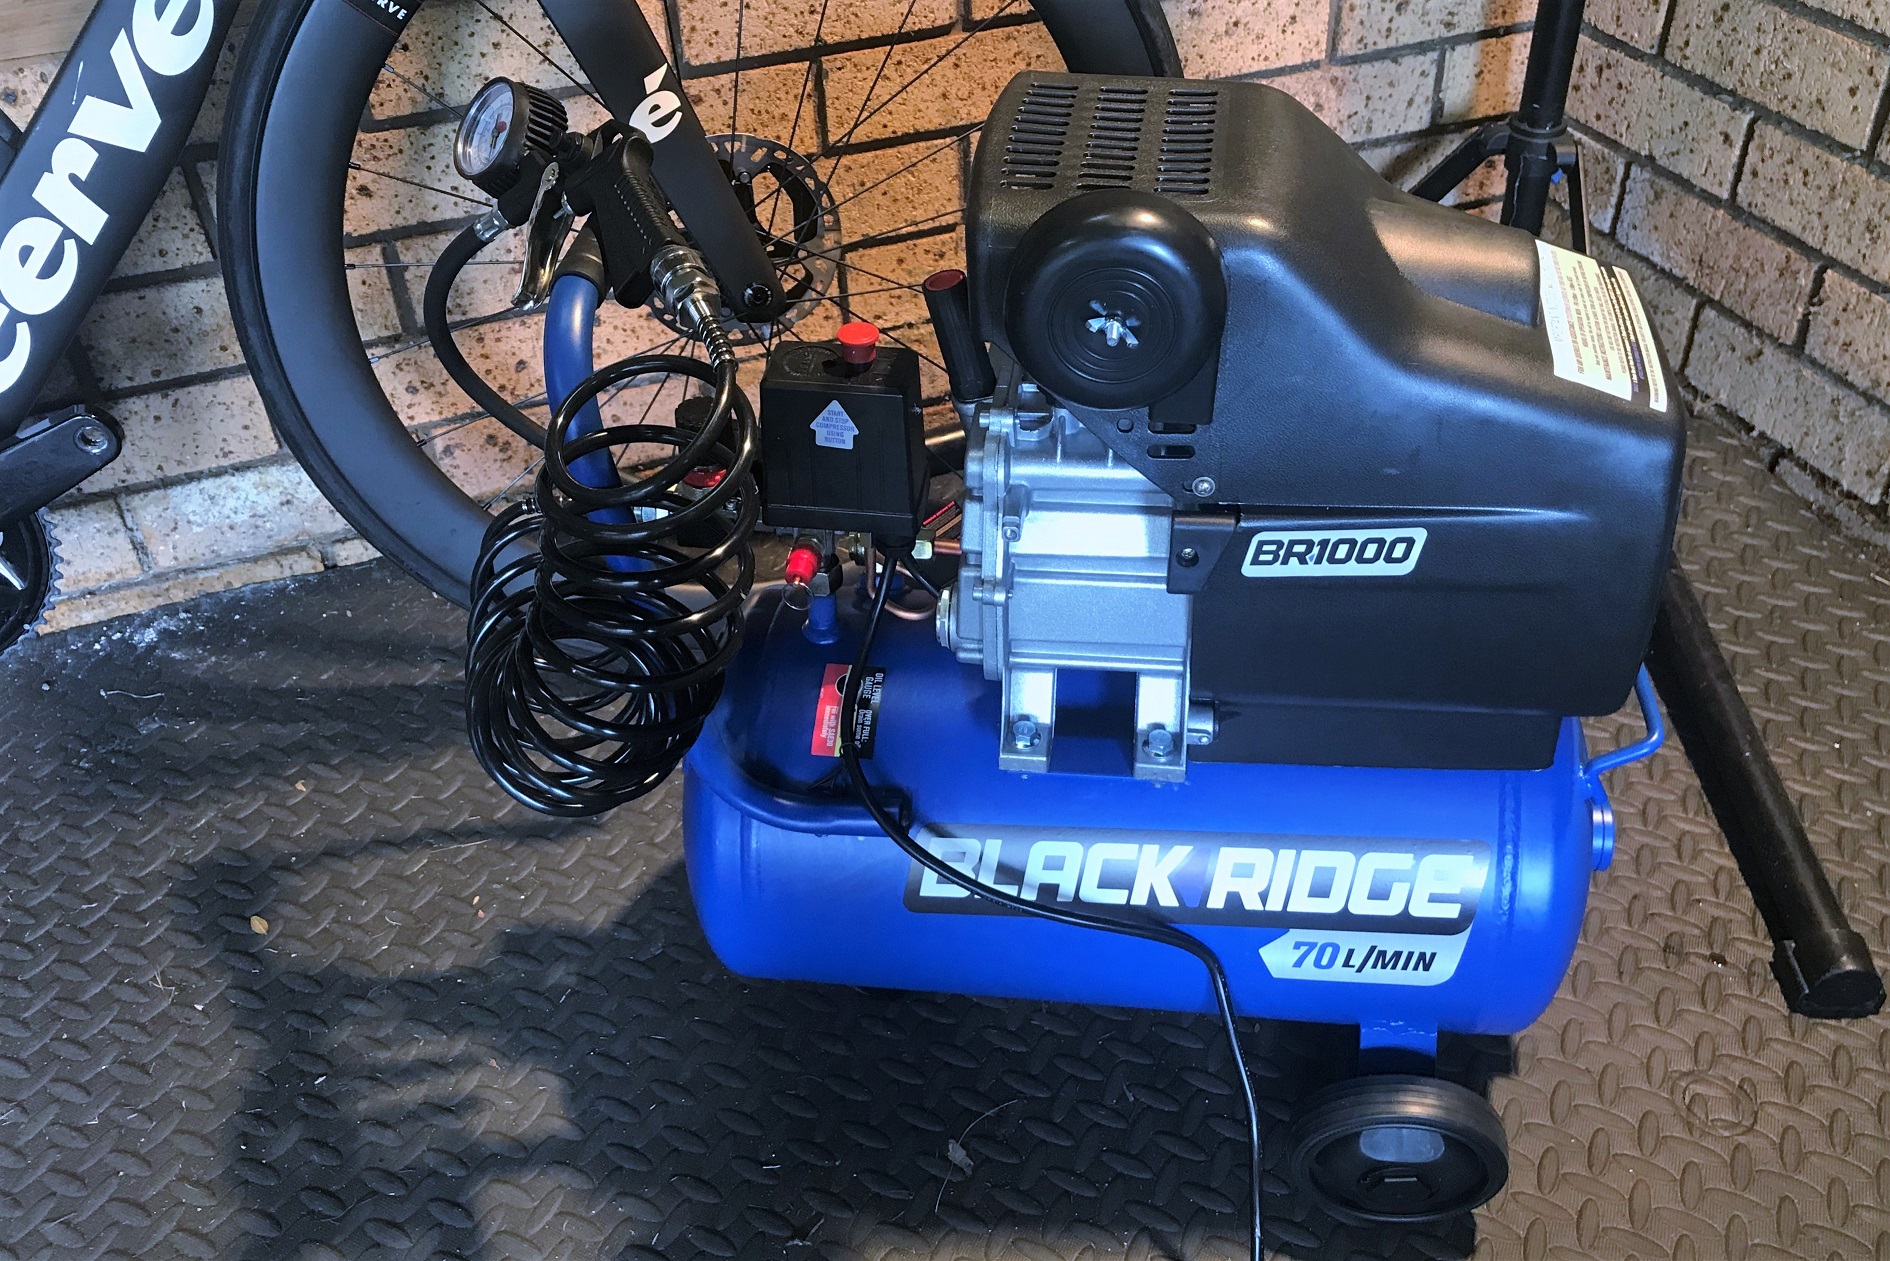
You can buy special “tubeless track pumps” for this. These have a chamber that can pumped up to deliver this blast of air, but an air compressor is the best tool for the job. I bought mine from the local auto parts shop for a similar price to a tubeless track pump. Remove the valve core, attach your air compressor and give it a blast.
If you’ve done it correctly, you should hear the tyre beads “snap” into place on the rim.
3) Still no luck? Strap it up! Two out of three of my tyres inflated and snapped into place with a short blast of air from the compressor. The third was a little tricky. Another trick of the trade is to use a ratchet strap to hold the tyre down against the rim. This reduces the amount of air that can escape. Once strapped down, give it another hit from the air compressor and the tyre should play nice.

4) Add sealant through the valve. Some people lever off part of the tyre, pour in sealant, then snap the tyre back on. While you can do things this way, you’re more likely to end up with a white sticky sealant mess on the floor. The cleanest method is to remove the valve core, then add sealant in via the valve. You can either use a syringe, or some sealant bottles have a small enough nozzle to fit into the valve.

5) Bounce to spread the love. Once you’ve added sealant, screw the valve core back in and added air to the tyre. You may or may not hear some small air leaks at this point. Now get your wheel and give it a bounce on the floor! Lightly bounce the inflated tyre up and down on the floor, rotating the wheel as you go. This helps spread the sealant across every internal surface and seal any small leaks.
BONUS: Go for a ride! The best way to ensure full sealant coverage is to go for a ride. Once you’ve completed setting up your wheels, step back and admire your handiwork, then head out for a short test ride. Don’t venture too far just in case (although if you’ve followed my tips there shouldn’t be any issues). Have an easy half hour roll around the neighbourhood to bask in your awesomeness. This ride helps to completely spread the sealant to coat every internal surface.

Congratulations! You’re now a member of the road tubeless army! 😁

Been flying a round the world tour on Microsoft flight sim (in VR) landed at Hobart last night and could see your little hill climb to the west of the bay on the approach.. hehehe
LikeLiked by 1 person
Nice! 😆 You’ll have to get over for real one day!
LikeLike
Hadn’t heard the ratchet strap tip before but it does make sense!
LikeLiked by 1 person
Step 6. Wonder why you never went tubeless before!
The best sealant I’ve found is Stans Race. It fills holes so well that you can’t put it in through the valve hole.
The only problem I’ve ever had with tubeless is when I’ve forgotten to check the sealant every 3 or 4 months. I use the dipstick method. Let the tyre down and remove the valve core then, with the valve at 6 o’clock, use a dipstick to make sure you’ve got 2 or 3 mm still in there.
One final tip;when pumping up your tyres have the valve at the 5 or 7 o’clock position so that there’s no chance of getting any back flow of sealant through the valve.
Enjoy!
LikeLiked by 2 people
Thanks for the tips! I thought about getting the race version of Stans, but injecting through the valve was an important feature for me. Not sure I could have added sealant, then inflated the tyre to get it locked on, without making a mess! Probably tyre-rim combination issue.
So far no issues on tubless. I’ve actually just ordered tubeless tyres and valves for my Canyon!
LikeLike
Awesome post, man. That ratchet strap idea is a new one by me. Dig it.
LikeLiked by 1 person
It works a treat!
LikeLiked by 1 person
I’ve never been tempted to go tubeless with my bicycles. I did convert the rear wheel of my motorcycle to tubeless. Really simple process and no goo to mess with.
The important part of sealing the rim tape to the rim is the rim being very clean. That means using very pure alcohol. Away from any flame of course. I used kitchen paper, (paper towels here) and alcohol that is used as fuel. Pure enough.
I run latex tubes and GP5000 folding tires, but don’t run across much that will poke holes in tires and tube such as thorns. In Colorado Goats Head thorns were the bane of cycling. They would drift in places to look like pea gravel or road sanding sand.
I once stuck a 6D nail through the tread of a high end silk casing folding clincher and out the sidewall. The latex tube was shoved aside and no flat, even with the nail banging away on my seat and chain stays.
All my flats for the last few years have been stem to tube failures. Or cut tires.
I expect the next bike I buy will come with tubeless ready wheels as that is the way the world is rotating. I’ll be forced into joining not only that cult but the disc brake cult and the electric shifting crowd. Hahaha
LikeLiked by 1 person
I was never really tempted before this bike (and my multiple Latex failures). The TT bike came set up tubed, but with tubeless-ready wheels and the tubeless valves supplied also, so I thought I’d give it a go. So far so good, but I guess we’ll see how it goes in the long term. It’s got all the things now! Tubeless, discs, Di2… 🤣
LikeLike